fbpx

Programmatic ARKit Positioning

Currently iOS does not support markers or targets in a similar fashion to Vuforia (at the moment of this writing iOS 11.3 has a similar feature but it’s not released). So what is the best way to drop an animation on a target? Assuming you’re dealing with a rectangular object we can use the Vision framework’s VNDetectRectanglesRequest

  // viewController 
  let pixelBuffer      = self.sceneView.session.currentFrame?.capturedImage 
  let ciImage          = CIImage(cvImageBuffer: pixelBuffer!) 
  let handler          = VNImageRequestHandler(ciImage: ciImage) 
  let rectService      = RectangleDetectionService(sceneView: self.sceneView)
  let rectangleRequest = VNDetectRectanglesRequest(completionHandler: rectService.handleRectangles) 
  do { 
    try handler.perform([rectangleRequest]) 
  } catch { 
    log.error(error) 
  } 

Above we’ve transformed the pixel buffer being received from ARKit (sceneView) into a ciImage that we then pass to the Vision Framework’s request handler. Then we create a new instance of our custom , then defined the completion handler once a rectangle is detected.

// RectangleDetectionService (rectService)

func handleRectangles(request: VNRequest, error: Error?) {
  guard let observations = request.results as? [VNRectangleObservation] else {
    return
  }
 
  // get the highest confidence rectangle observation
  let highConfidenceObservation = observations.max { a, b in a.confidence < b.confidence }
 
   guard let highestConfidenceObservation = highConfidenceObservation else {
    return
   }
 
   // Calculates the position of the 4 corners
   let points = [highConfidenceObservation?.topLeft,
                 highConfidenceObservation?.topRight,
                 highConfidenceObservation?.bottomRight,
                 highConfidenceObservation?.bottomLeft]
 
   // Calculates center point
   let center         = CGPoint(x: (highConfidenceObservation?.boundingBox.midX)!,
                                y: (highConfidenceObservation?.boundingBox.midY)!)

   // create a hit test simulating a user touch at the point within the sceneview
   let hitTestResults = self.sceneView.hitTest(center, types: [.existingPlaneUsingExtent, .featurePoint])
   guard let result = hitTestResults.first else {
     print("Rectangle detection error")
     return
   }
  
    // now that we've calculated a center point and created a hit test in the arView
    anchor = ARAnchor(transform: result.worldTransform)
    self.sceneView.session.add(anchor: anchor)
}

You should now have an ARAnchor at the center point of the detected rectangle

Using Wicked PDF gem in rails in a docker container

When you need to generate a PDF in your rails application the wicked PDF gem is great and easy to use. But requires the wkhtmltopdf binary to run. If you are running you rails app in a docker container be sure to use the linux binary. Go to https://wkhtmltopdf.org/downloads.html and download the linux 64-bit binary to your rails bin directory. Open bash in your docker container and cd into the bin directory:

docker-compose run app bash
cd bin

Then uncompress your binary:

tar -xJf wkhtmltox-0.12.4_linux-generic-amd64.tar.xz

Reference the new binary for your development environment in the initializer:

if Rails.env.production?
  wkhtmltopdf_path = "#{Rails.root}/bin/wkhtmltopdf-prod"
else
  wkhtmltopdf_path = "#{Rails.root}/bin/wkhtmltox/bin/wkhtmltopdf"            
end

Global Custom Fields in WordPress with ACF Pro

At T R I M, we frequently use the Advanced Custom Fields Pro plugin on our WordPress projects to give our clients flexibility to edit copy on custom page templates. Generally these custom fields are assigned and scoped to a specific Post or Page in your WordPress site. This week I was looking for a way to create custom fields that could be accessed from any Page or Post in the project.

After digging through documentation I found that ACF Pro gives us the ability to create fields which can be accessed globally, via an Options Page. ACF also provides a few functions to do the heavy lifting for us acf_add_options_page() and acf_add_options_sub_page().

Let’s take a look at how to use them.

functions.php


// First we check to see if acf_add_options_page is a function.
// If it is not, then we probably do not have ACF Pro installed
if( function_exists('acf_add_options_page') ) {
	
  // Let's add our Options Page
  acf_add_options_page(array(
    'page_title' 	=> 'Theme Options',
    'menu_title'	=> 'Theme Options',
    'menu_slug' 	=> 'theme-options',
    'capability'	=> 'edit_posts'
  ));
  
  // If we want to add multiple sections to our Options Page
  // we can do so with an Options Sub Page.
  acf_add_options_sub_page(array(
    'page_title' 	=> "Let's Work Together",
    'parent_slug'	=> 'theme-options',  // 'menu_slug' on the parent options page
    'menu_title'	=> "Let's Work Together",
    'menu_slug' 	=> 'lets-work-together',
  ));
  
  acf_add_options_sub_page(array(
    'page_title' 	=> 'Footer Settings',
    'parent_slug'	=> 'theme-options',
    'menu_title'	=> 'Footer Settings',
    'menu_slug' 	=> 'footer-settings',
  ));
  
}


With this setup, if we go back to our WordPress Dashoboard we can see that we now have our ‘Theme Options’ menu item, with our Options Sub Pages nested inside.


Now we can create our custom fields an add them to an Options [Sub] Page.

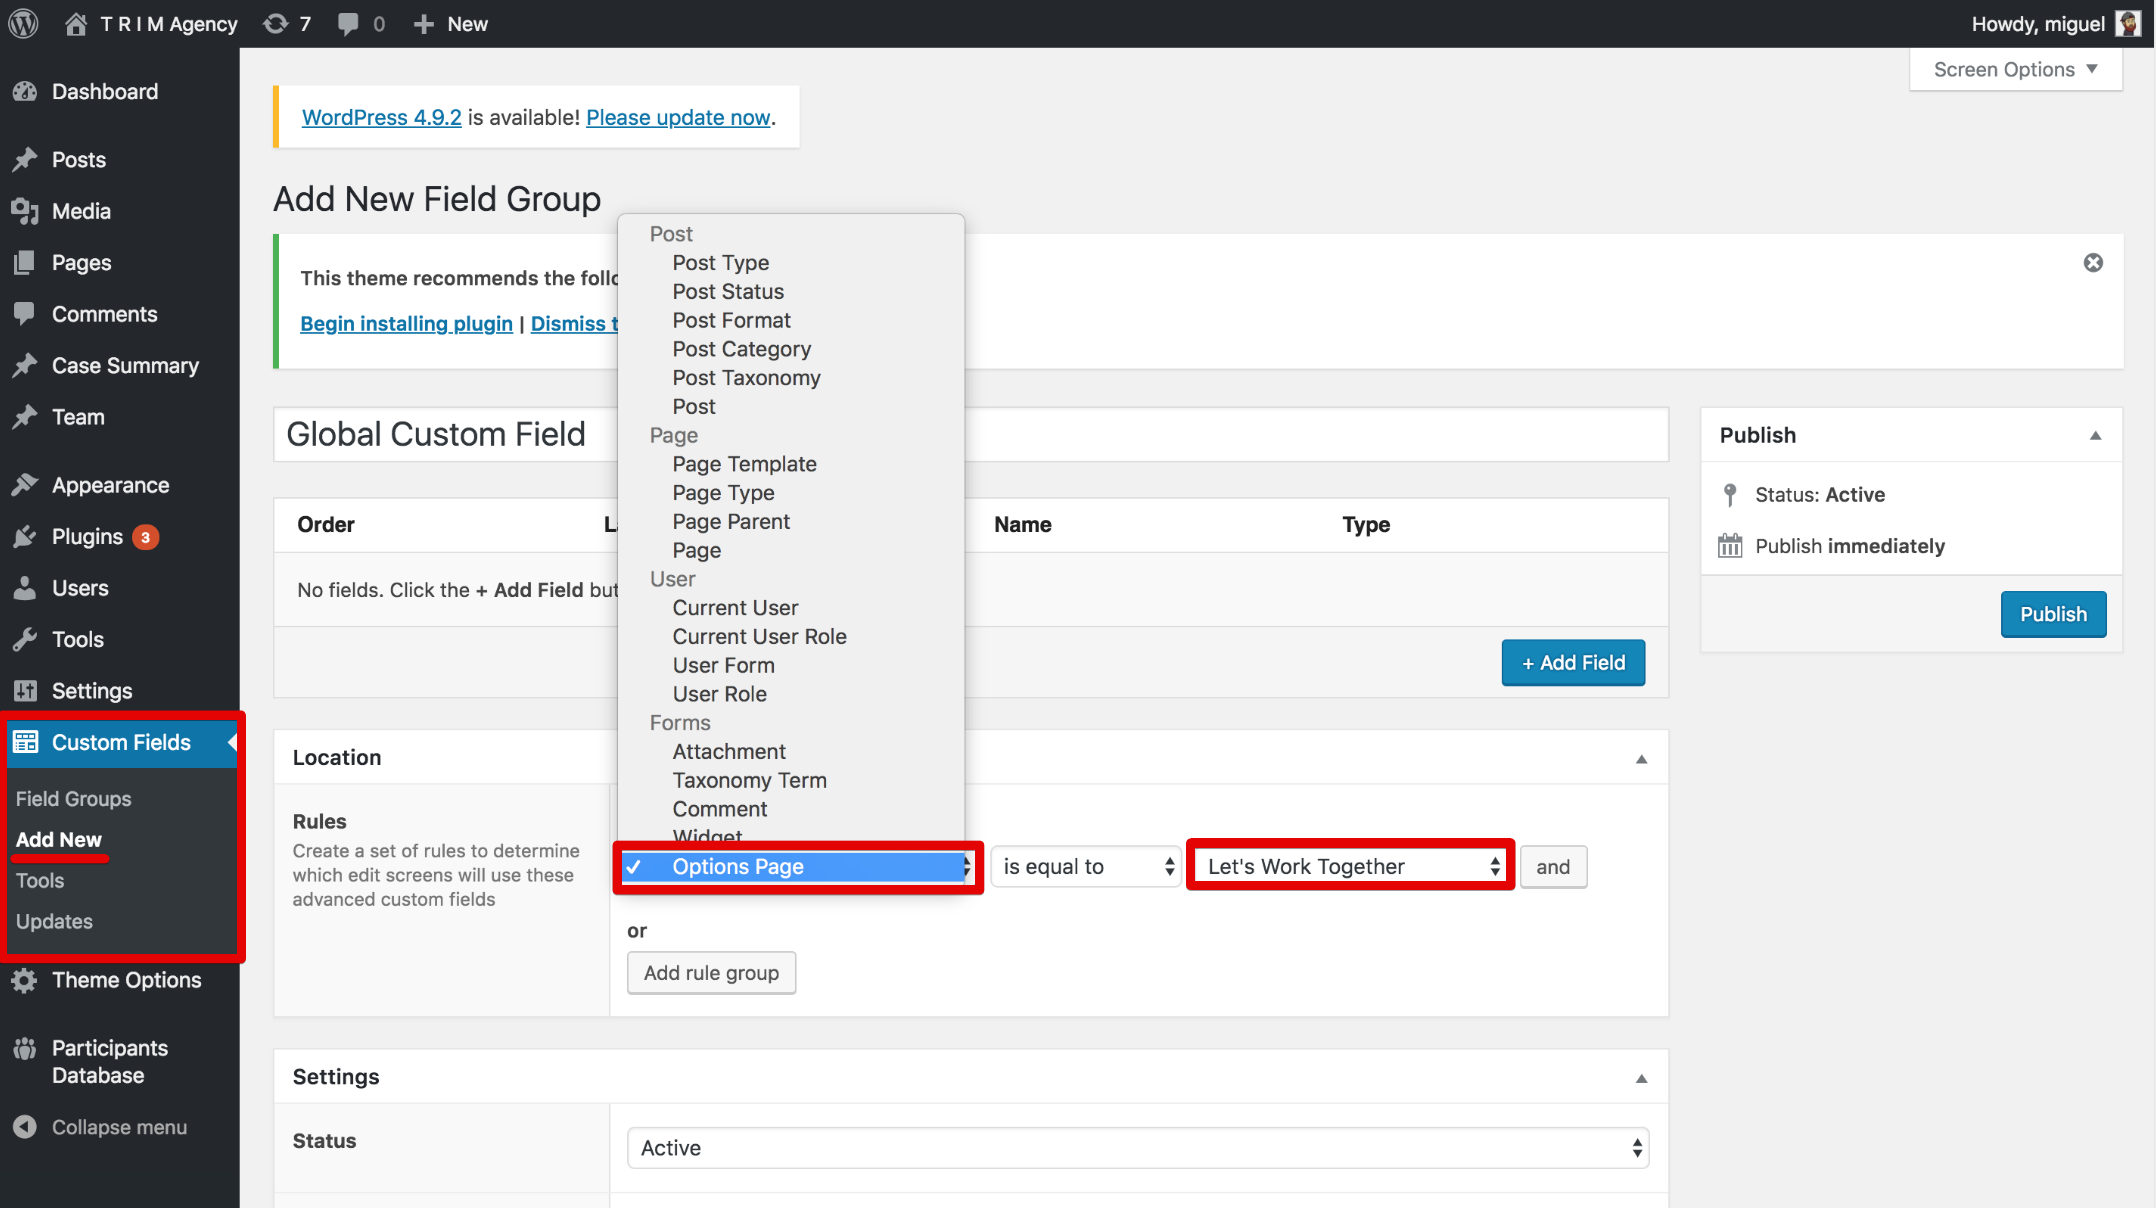
Under Location make sure that you set the Options Page equal to your desired Options Sub Page, where you would like to see this custom field.

We now have our custom fields available on the Options Sub Page.


To wrap this all up we just need to make a call to our custom fields in the page template.

// To add a your custom fields we'll use the usual suspects, the_field() or get_field().

// if we want to echo the field's content directly to our template
the_field('field_name, 'option');

// if we want to store the field's content in a variable to use later
$var_name = get_field('field_name', 'option');

To learn more about using Options with ACF Pro pages you can refer to the documentation.

Testing a Multipart Form Upload in Rails/Rspec

I was working on a Rails API the other day and had to setup multipart form uploads.  A lot of the time we will Base64 encode a file and send it along with the JSON so this was a bit new to me.  The only snag I hit was in setting up the post in our request spec.  So here is an example of how to create a post request in RSpec with a file upload under the key of video along with headers.

 post users_video_path(user.id),
      params: { video: Rack::Test::UploadedFile.new("#{Rails.root}/spec/support/attachments/test_video.m4v", 'video/m4v') },
      headers:  { 'Authorization' =&gt; 'Bearer XXXXXXXXXXXXXXXXXXXXXXXXXXX' }