fbpx

Slack Hotkeys and Shortcuts

If you are not already familiar with Slack, it is a messaging platform geared towards improving productivity for business and organizations. You can do all kind of neat things in Slack from posting a simple GIF to building custom integrations which automate your daily tasks.

Enough about what slack is or isn’t, this is about teaching you some of my favorite tips and tricks that will make you love using Slack even more.


Navigation

Quick Switcher⌘ + T / Ctrl + T

This is basically spotlight for Slack.
Quickly jump straight into any Channel or Direct Message. Just begin typing the Channel or username that you wish to go to and Slack will give you autocomplete suggestions. Alternatively, you can use K instead of T, if you prefer to use your left hand.

Channel History⌘ + ← / Ctrl + ← and ⌘ + → / Ctrl + →

These allow you to navigate backwards and forwards through your Channel or DM History. This is pretty handy if you ever need to bounce between 2-3 particular channels. The [ and ] keys can be use instead in place of and , respectively.


Messages

Quick Edit

Oops! Did you make a typo? Just press the up arrow key to edit your message!

Jump to Unread Messages⌘ + J / Ctrl + J

This just takes you to the first unread message in your current Channel or DM.

Mark Messages as ReadEsc

Mark any unread message in you current Channel or DM as read

Mark all Messages as ReadShift + Esc

Mark all unread message in you current Channel or DM as read

Mark a Message as Unread⌥ + click / Alt + click

Have you ever read but are not able to address it immediately? Just it to Hold the ⌥ (option) or alt key and click on a message to mark it as un read so that you can easily find it later when you do have time to respond.


Voice and Video Calls

Toggle MuteM

Just hit the M key to quickly Mute or Unmute yourself.

Toggle Video BroadcastV

Similarly to the Mute Toggle, you can turn your video broadcast on and off with a tap of the V key.


Everything Else

Did I miss something?⌘ + ? / Ctrl + ?

Slack also gives a built in list of all of their available Hotkeys and Shortcuts. Take a look for yourself and see what other usefull shortcuts Slack gives you.

Happy Slacking!

Using jQuery.queue() to call Functions Synchronously

This week I was working on a project that required me to add a css class to an element within a sequence of events. First I wanted to fadeOut() an array of elements, wait a moment, and then add a class to another element.

Because Javascript is asynchronous, on my first attempt everything executed, just not in the order I had anticipated.

Enter jQuery.queue().

This handy little function allows you to pass in a callback with next as a parameter, enabling you to call jQuery and Javascript synchronously.

someElements.fadeOut()
            .delay(200)
            .queue(function(next) {
              otherElements.removeClass('active');
              thisElement.addClass('active');
              next(); // continue to next line
            });
someElements.fadeIn();

Now we can call fadeOut() on someElements, handle adding and removing classes after our delay() and then fade someElements back in.

Global Custom Fields in WordPress with ACF Pro

At T R I M, we frequently use the Advanced Custom Fields Pro plugin on our WordPress projects to give our clients flexibility to edit copy on custom page templates. Generally these custom fields are assigned and scoped to a specific Post or Page in your WordPress site. This week I was looking for a way to create custom fields that could be accessed from any Page or Post in the project.

After digging through documentation I found that ACF Pro gives us the ability to create fields which can be accessed globally, via an Options Page. ACF also provides a few functions to do the heavy lifting for us acf_add_options_page() and acf_add_options_sub_page().

Let’s take a look at how to use them.

functions.php


// First we check to see if acf_add_options_page is a function.
// If it is not, then we probably do not have ACF Pro installed
if( function_exists('acf_add_options_page') ) {
	
  // Let's add our Options Page
  acf_add_options_page(array(
    'page_title' 	=> 'Theme Options',
    'menu_title'	=> 'Theme Options',
    'menu_slug' 	=> 'theme-options',
    'capability'	=> 'edit_posts'
  ));
  
  // If we want to add multiple sections to our Options Page
  // we can do so with an Options Sub Page.
  acf_add_options_sub_page(array(
    'page_title' 	=> "Let's Work Together",
    'parent_slug'	=> 'theme-options',  // 'menu_slug' on the parent options page
    'menu_title'	=> "Let's Work Together",
    'menu_slug' 	=> 'lets-work-together',
  ));
  
  acf_add_options_sub_page(array(
    'page_title' 	=> 'Footer Settings',
    'parent_slug'	=> 'theme-options',
    'menu_title'	=> 'Footer Settings',
    'menu_slug' 	=> 'footer-settings',
  ));
  
}


With this setup, if we go back to our WordPress Dashoboard we can see that we now have our ‘Theme Options’ menu item, with our Options Sub Pages nested inside.


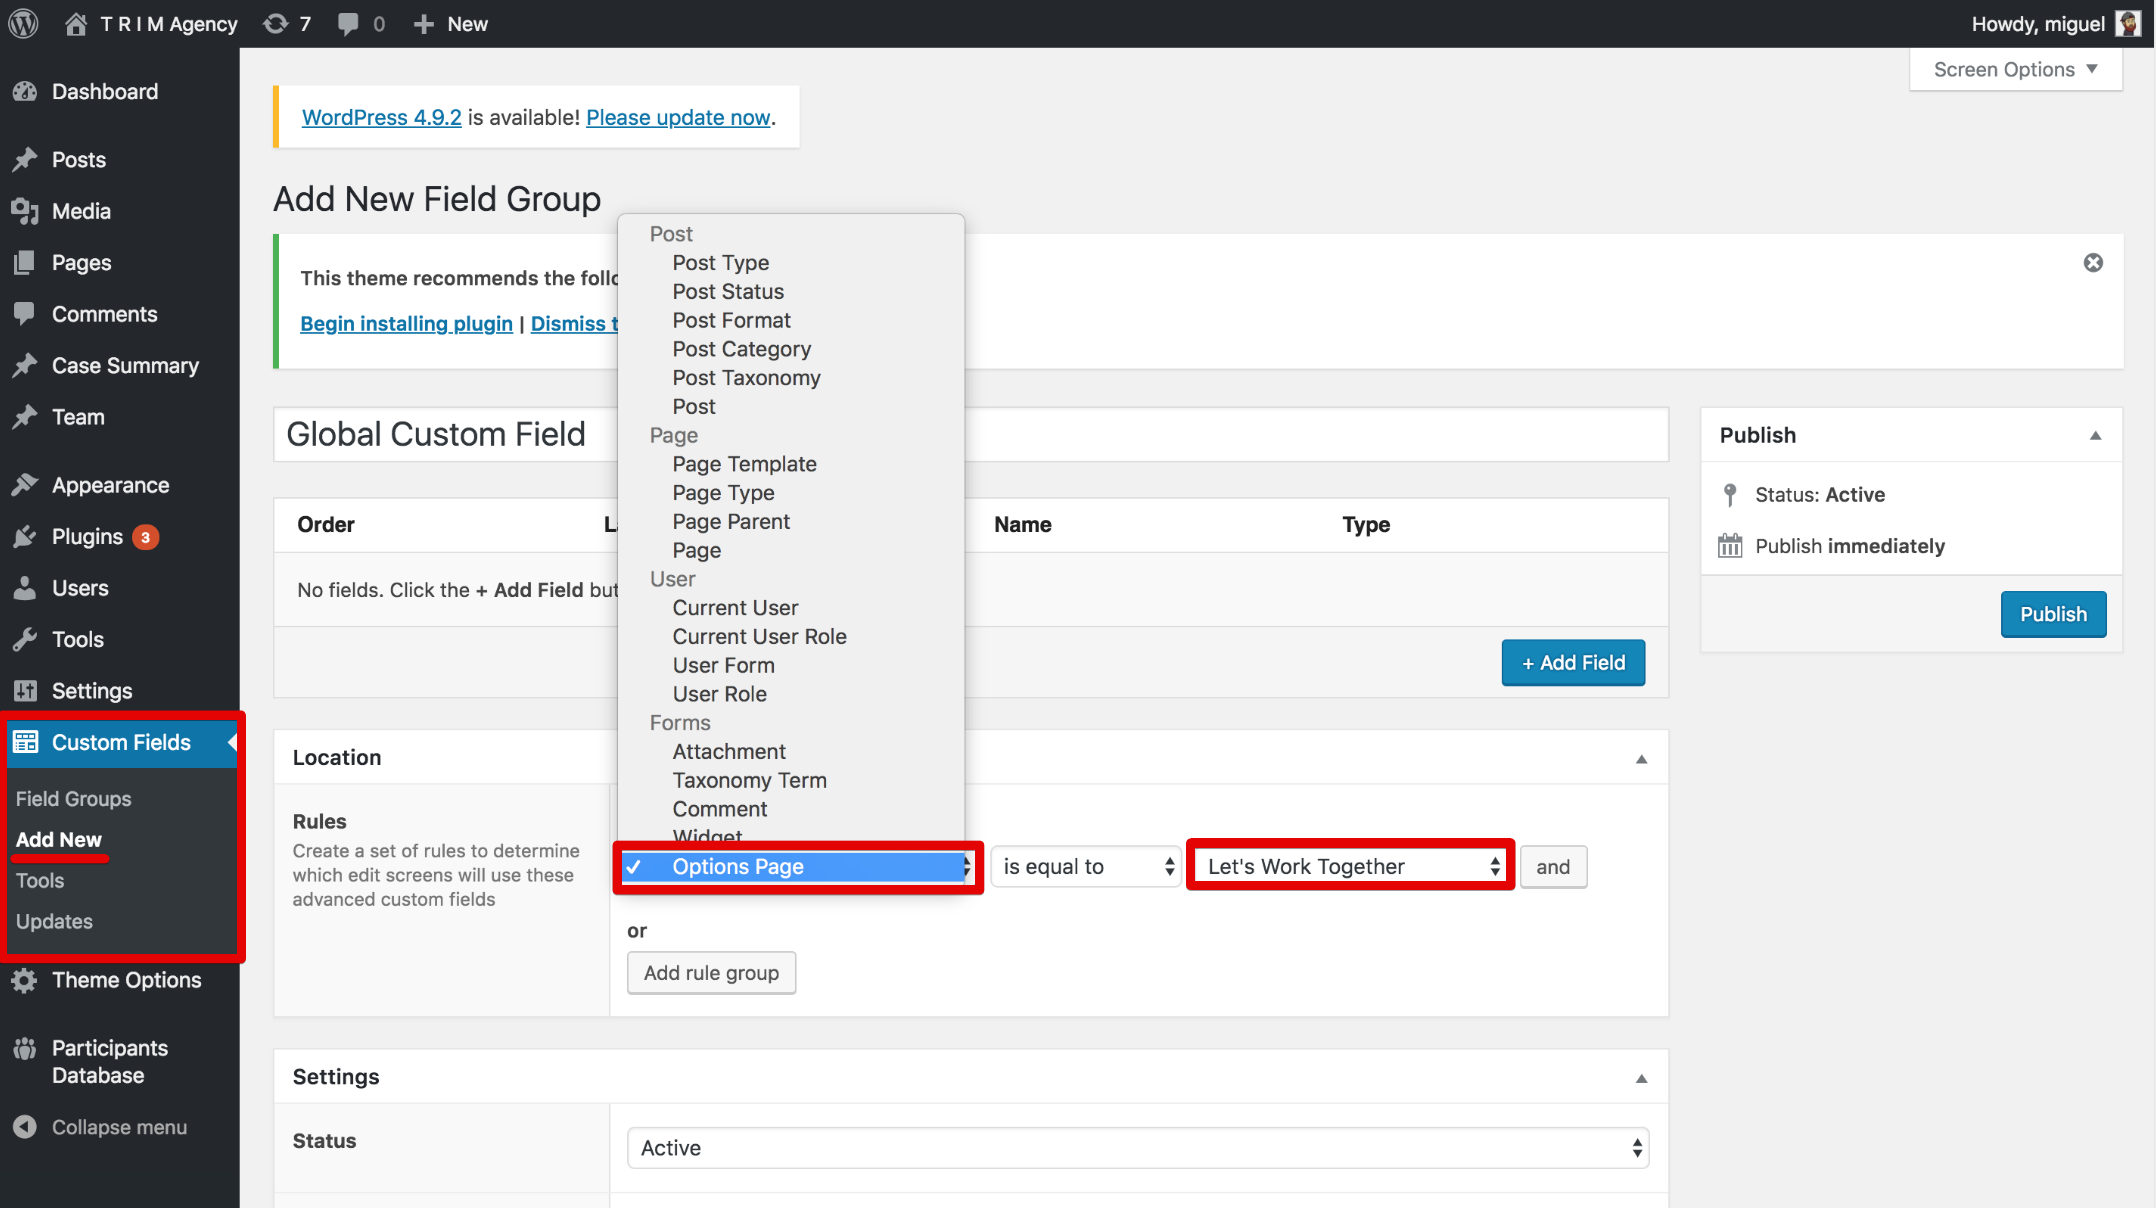
Now we can create our custom fields an add them to an Options [Sub] Page.

Under Location make sure that you set the Options Page equal to your desired Options Sub Page, where you would like to see this custom field.

We now have our custom fields available on the Options Sub Page.


To wrap this all up we just need to make a call to our custom fields in the page template.

// To add a your custom fields we'll use the usual suspects, the_field() or get_field().

// if we want to echo the field's content directly to our template
the_field('field_name, 'option');

// if we want to store the field's content in a variable to use later
$var_name = get_field('field_name', 'option');

To learn more about using Options with ACF Pro pages you can refer to the documentation.

Angular 1.x Dropdown Menus
(Removing The Blank Option)

Over the past week I kept running into the issue of iterating over an array or an object in a <select> field with ng-repeat, only to find that I had a blank option as the first item in the dropdown.  After trying several strategies, I finally found one that worked.

Let’s say you want to iterate over the array ctrl.items in your <select> field.

some.component.js

(function() {
  'use strict';

  function SomeController() {

    var ctrl = this;

    // item array for dropdown
    ctrl.items = [
      {
        select: 'data1',
        label: 'Option 1'
      }, {
        select: 'data2',
        label: 'Option 2'
      }, {
        select: 'data3',
        label: 'Option 3'
      }
    ];

  }

  angular
    .module('app')
    .component('someComponent', {
      controller: SomeController,
      templateUrl: '/app/components/some.component.html',
    });
})();

Instead of using ng-repeat, this can be accomplished with ng-options.

ng-options Pattern Usage: select as label for value in array

some.component.html

<select name="selectName"
        ng-model="$ctrl.formName.selectName"
        ng-options="item.select as item.label for item in $ctrl.items">

  <!-- this option sets the dropdown placeholder -->
  <!-- value must be an empty string for this to work -->
  <option value="" selected="selected">Select an Item</option>
</select>

Where: select: value that will be submitted or bound to the model of the parent label: each <option> shown in dropdown list value: local variable for each array item or object property value being iterated over.

You can find more ng-options usage patterns in the AngularJS API Documentation

CSS Image Masking

Today I learned a very efficient way to create triangular cutouts using solid colored and transparent css borders.

The angle of the triangle cutouts can be changed by adjusting the widths of the borders and the height of the mask div.

For best view of Results, click “Edit On CodePen”

See the Pen CSS Triangle Image Mask by Miguel Lozano (@MiguelDotL) on CodePen.